
 在线客服
在线客服 企业微信
企业微信


一、概述
本文主要介绍使用 HI-TOP 网关 HT3S-EIS-COP 在汇川 H5U-A8 和汇川 660C 伺服之间
进行数据交换。
解决的问题:汇川 660C 伺服做从站与汇川 H5U-A8 进行数据交换。
解决方法:使用 HI-TOP 网关 HT3S-EIS-COP。汇川 H5U-A8 支持 EtherNET/IP 协议,
汇川 660C 伺服支持 CANopen 协议,而 HI-TOP 网关 HT3S-EIS-COP 可以在 EtherNET/IP 网
络和 CANopen 网络之间传送数据。以下为测试环境:

二、汇川 660C 伺服
2.1 参数表
(1)汇川 660C 伺服支持 CANopen 协议,在其手册中可以看到它使用参数对应的设置
如下:
电机
6040
运行参数

(
2
)伺参数的设置服通过伺服上的按键进行调节。
运行时伺服显示界面,
81rn
H02.00
设置
8
,为
CANOPEN
H0C.00
设置为
2
,站地址为
2
H0C.08
设置为
5.
波特率为
500k

三、网关的配置
3.1 HT3S-EIS-COP 网关介绍
HT3S-EIS-COP 是一款 EtherNET/IP 从站功能的通讯网关。该产品主要功能是将各种
CANopen 设备接入到 EtherNET/IP 网络中。本网关连接到 EtherNET/IP 总线中作为从站使
用,连接到 CANopen 总线中作为主站使用。


下面来介绍 HT3S-EIS-COP 的配置,网关所有的配置是使用 GW Modbus Builder 和 GW
CANopen Builder 俩款软件来进行配置的。
4
3.2 配置网关 EtherNET/IP 的 IP 地址
使用 GW Modbus Builder 连接到 HT3S-EIS-COP 网关的 P1 口,并将拨码第 8 位拨到
ON,如下图所示。此时网关 P1 口地址为:192.168.1.100。

选择菜单“设置 -> 通信设置 -> 以太网设置”:

在弹出的窗口中选择本机连接网关 P1 口的网卡的地址,并输入网关的地址(这里是
192.168.1.100),点击确认按钮。注意,计算机网卡地址和网关地址要在同一网段。

然后选择“工具->在线”菜单:

在协议选择框中选择“EtherNET/IP 配置”,点击确认按钮。

点击“连接从站”按钮,连接成功后,其他按钮会变成可以点击的状态:


点击
“
读取配置
”
按钮后,显示网关目前的实际
IP
地址
:

填写用户需要的
IP
地址,点击
“
写入配置
”
按钮
,
写入成功后,会弹出
OK
的对
话框:

配置完成后需将拨码
8
位拨回
OFF
,然后断电重启。
3.3 网关连接 CANopen 设备的连接
使用专用线 缆进行连接,网口连接伺服的 RJ45 A 端,串口线连接至网关的 CANopen
端,L 与 L 接,H 与 H 接,RL 与 L 短接,RH 与 H 短接。


3.4 配置 CANopen 的参数
使用 GW CANopen Builder 连接到 HT3S-EIS-COP 网关的 LAN 口,如下图所示。网关
LAN 口,地址为:192.168.1.201。

3.4.1
导入
EDS
文件
(
1
)打开
GW Canopen Builder
软件,点击“工具——导入
EDS
”按钮。

(
2
)选择相应的
EDS
文件,点击打开

(
3
)导入成功后,可以在右侧设备列表中找到从站设备,如下图:


3.4.2
添加设备
(
1
)使用
GW Canopen Builder
软件进行网关的
CANopen
配置,首先添加一个
CANopen
主站,如下图:


(
2
)根据需要添加
CANopen
从站


(
3
)右键单击主站图标,选择属性页面,设置主站波特率、定时发送间隔和主站
心跳时间,如下图:


(
4
)双击主站图标,从所有节点列表里选择需要添加到心跳监控列表里的从站,
如下图:


3.4.3
配置
CANopen
的
PDO
(
1
)
双击从站的图标,配置该从站的参数。选中
RXPDO
(
1400
),点击“
PDO
映射”按
钮

如下图所示,在弹出的对话框中,选择
6040
控制字、
6060
运行模式删掉
60FF
,
然后点击确定。


(
2
)选中
TXPDO
(
1800
),点击“
PDO
映射”按钮


如下图所示,在弹出的对话框中,查看状态字是否含有
6041
状态字,然后点
击确定。

再选中
TXPDO
(
1800
),点击“属性”按钮:

输入
TXPDO
定时发送时间,例如
100ms,
、
50ms
、传输类型
255
,点确定。

3.5 下载到网关
(
1
)点击菜单栏“设置”——“以太网设置”,可以修改网关的
IP
。

( 2 )电脑与网关用网线连接,选择下载按钮,可以将配置后的信息传送给网关。
下载之前会弹出保存项目的对话框,保存即可。下载成功后消息框显示如下:


3.6 使用汇川系统的配置方法
(
1
) 打开
autoshop
新建一个项目,导入网关的
eds
文件


(
2
) 在打开的界面选择选择网关的
eds
文件,导入后重启软件。


(
3
) 重启后在打开的界面右击 项目树中的
ETHERNET/IP
,进行扫描设备并添加:


将扫描到的设备更新到总线上


(
4
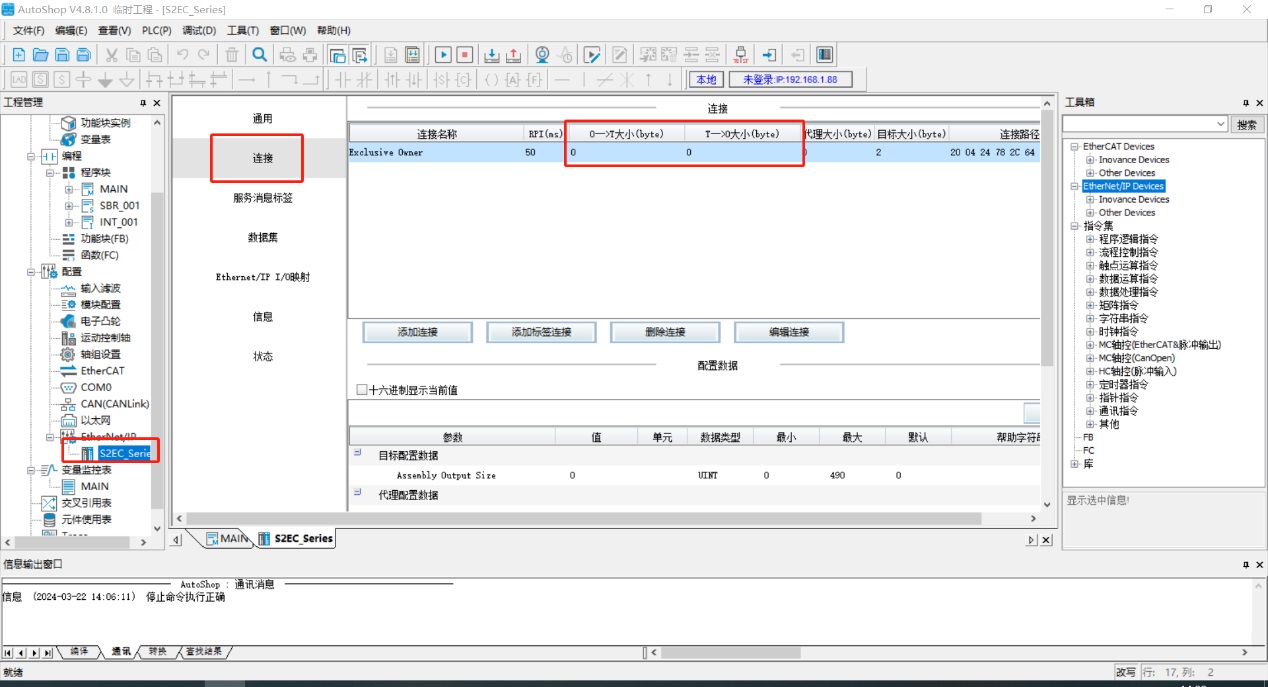
)
EtherNet/IP
输入输出设置
双击添加的网关,在弹出的界面选择“连接
-
双击设置
0--
》
T
大小”进行设置长度,
双击下图中红框位置,进入长度设置。

首先在标签组里面注册输入输出数据:


(
5
) 编译并下载汇川
PLC
的程序。

四、运行结果
4.1 运行步骤
1. 网关的拨码开关第 8 位为 OFF(运行模式)。
2. 连接网关 P1 口到汇川 H5U-A8 的 EtherNET/IP 网口,连接 CANopen 接口接到到汇
川 660C 伺服的接口
网关正常运行时各指示灯如下图所示,EtherNET/IP 的 OK 灯亮, CANopen 的 RUN 灯常亮、
RX 和 TX 闪烁。如下图所示:


3. 启动 PLC。
4. 输入参数
4.2 参数的读取
PLC 编程软件 H5U-A8 中切换到监控器模式,找到变量表进行监控,在 PLC 中输出电
机启动参数,如下图所示。


依次输入
0X0600
、
0X0700
、
0X0F00
、
0X1F00,
电机启动,在汇川
660C
伺服电机转动时会有
数据变化


